
Greetings Adventurers!
Welcome to another article in our series on party composition.
A few weeks ago, I wrote an article about increasing the difficult of the campaign, which you can read here. In that article were some achievements to attempt, including one for completing the campaign with no more than three Adventurers. Today we are going to be building a party to attempt that goal.
Why run with fewer Adventurers?
Think of it as “Ultimate Hard Mode.” A true test of adventuring skill and prowess. With only three party members there is no back up for a rescue mission, you must complete each Quest with 25% fewer actions every turn, and you have to make sure your Skill and Spell selection is tight as your party will need to cover all the bases with less resources.
Step 1 – Character Selection:
The first thing we need to do is try and offset some of the penalties we have given ourselves. With only three Adventurers we will only have six actions per turn instead of the usual eight. Which means we are going to want three Adventurers with the ability to gain an extra action as they rank up. This leaves us with Brahm, Galen, Greet, Moranna, Nerinda, and Unger.
Before we get started though, let’s take a moment to discuss “Action Compression.” Action Compression refers to any time a single action can accomplish more than a single outcome. This is good for us because we need to make every action count in this party so we need to look for ways we can get Action Compression from our Character and Class choices.
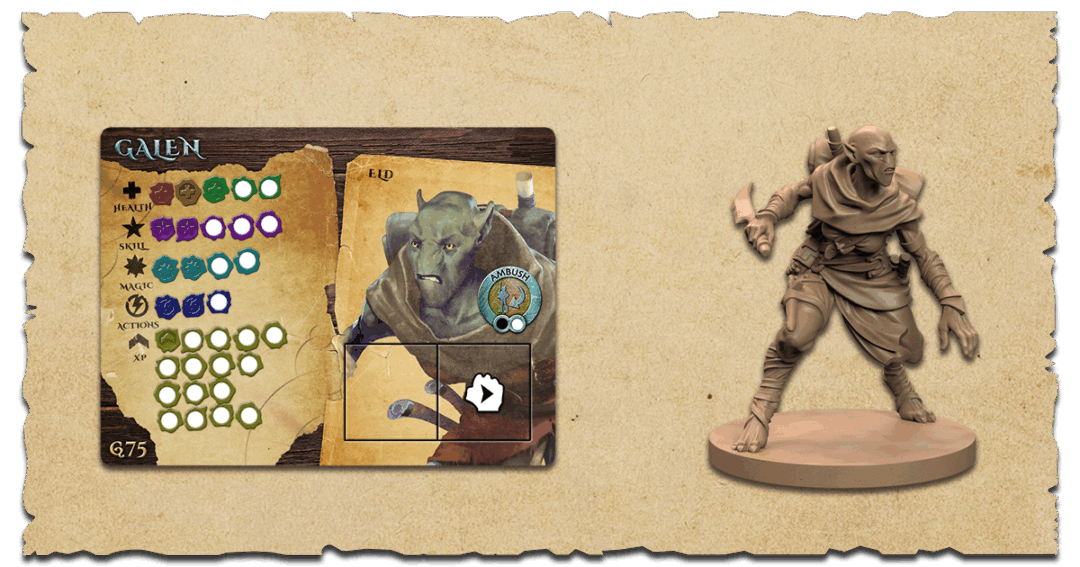
Galen:
Galen is a great first choice for the party as he comes with First Strike. This is a hard-to-get ability for Adventurers as it only appears on the Shillelagh and Blade of Momentum, so having it from the start is a huge bonus.
First Strike: First Strike is the gold standard of Action Compression in Maladum. Normally an Adventurer can Move OR Attack with one action, First Strike allows them to do both.
Ambus rank 1: If Galen can stay in cover, he can use Ambush to great effect. At rank 1 it is a reliable source of free additional ranged attacks, however at rank 2, Galen becomes a melee combat beast. Rank 2 allows a move followed by an attack, if that move gets him engaged in melee range, he can leverage First Strike for two attacks after he moves if needed.

Nerinda:
With a Health and Skill statistic of six, she is only equalled or outclassed by Kriga and Hendley who both lose out on that much needed third action, making Nerinda a perfect fit in our party.
Unarmed Combat 1: Always being able to perform an Attack even if your weapon breaks or is scattered or stolen through Plunderer is great. Nerinda isn’t as powerful as Grogmar so we are going to need to find a way to increase the value to at least two to make it more reliable but that shouldn’t be too hard.
Weapon Master rank 1: We have looked at Weapons Master in previous articles as it allows an Adventurer to perform an attack as an effortless action. Sadly, Nerinda only has rank 1 so cannot benefit from this. It is still a valuable Skill as it allows an attack at the cost of a Skill peg and comes with a re-roll. We may want to find her a Class that also has Weapon Master so we can start her off at rank 2 though.
Fleet of Foot rank 1: Is another great Skill peg = action option for Adventurers. Skills that allow for basic actions simply add more utility to a party. In our case, having less actions all-round to begin with, the value of such Skills increases.
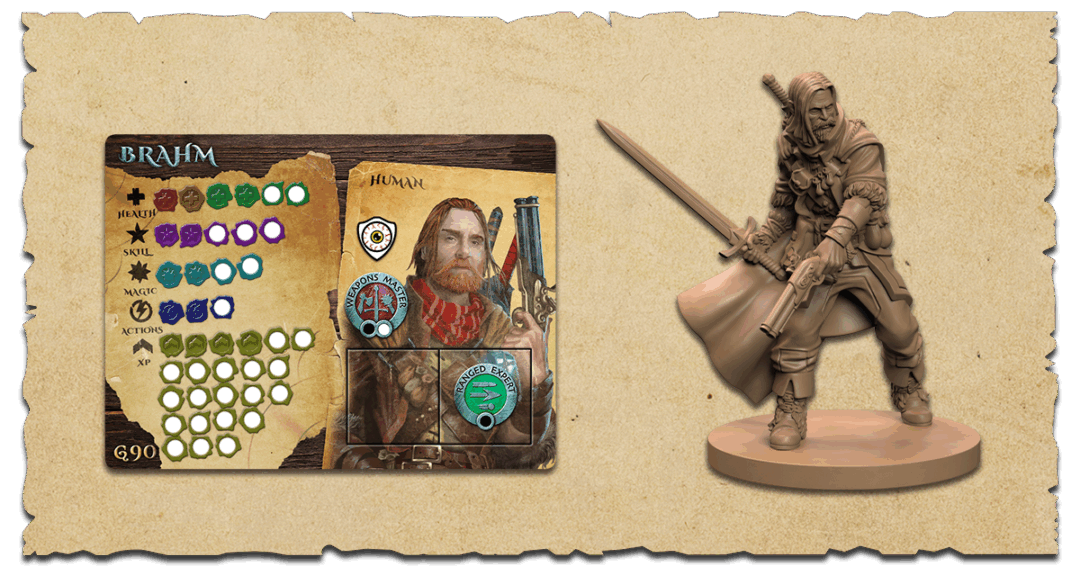
Brahm:
Given our reduced party size, we may as well take the G90 powerhouse that is Brahm. Only Hendley and Grogmar have more Health. A Skill statistic of five and a Magic Statistic of four mean his Class options are open to anything, and he starts with four experience points.
Immune to Terrified: Of all the Status Effects that can be picked up in a game of Maladum, Terrified is probably the hardest to play round. It is the only one where you lose complete control over what actions your Adventurer can perform. While Fatigued may lower the number of actions you have and Stunned can prevent you from activating at all, Terrified forces your Adventurer to flee. When they do so they use all available actions to move as far away as possible from all enemies. This also means they will probably be as far away as possible from the rest of the party, the direction of travel through the quest and any objectives that might need to be accomplished. Since we are building a party of Adventurers with three actions, that is a massive distance to overcome. While you can spend a Skill peg to avoid Terrified, having an Adventurer completely immune to it is certainly going to help.
Weapon Master rank 1: Unlike Nerinda, Braham can get to rank 2 on his Character board which, like his robust set of statistics, give him incredible freedom over his Class choice as we do not have to add Weapon Master from another source.
Ranged Expert rank 1: Allows Brahm to ready a ranged weapon as an effortless action and use a ranged weapon when making a melee attack (which works with Weapon Master).
Step 2 – Role/Class Selection:
Trying to cover all the party roles with three Adventurers is going to be a tall order. Since none of our chosen Adventurers have a particularly high Magic statistic, we are going to run without a Maladaar, and by extension, no Eudaemon. This means will forgo building a healer. Instead, we are going to rely on the simple solution of just throwing dice and damage at all our problems and hoping for the best.
Tank:
Tanks need to wear armour which means their armour slots will fill up fast. This means Galen isn’t really suited for this role as he will lose First Strike. Nerinda has more Skill pegs than Brahm which makes her the optimal choice. Guardian gives her the extra ranks of Weapon Master as well as Onslaught which can provide even more attacks. The extra Health peg puts her to a very tanky seven health. While Impervious and Steady help her fulfil her tanking duties.
Support:
Strategists are the ultimate support Class. Unfortunately, at G20, it can be exceedingly difficult to include one. Since we only have three Adventurers though, we can put that unused money to effective use. Galen can make significant use from the three additional experience points the Class offers, Brahm now starts with SEVEN! experience points to spend which lets him start with nearly every single Skill at rank 1. Training is a fantastic Skill for Action Compression as it allows multiple Adventurers to perform the same action at the same time, even out of sequence. Tactical Gift offers up even more utility by allowing the whole party to perform additional actions. Ranged Expert, Ready for Anything and Weapon Master also mean that although Brahm is technically our Support character, he can dish out some serious punishment as a damage dealer as well.
Damage Dealer:
This leaves Galen in a pure damage dealing role. Sellsword is probably the best option for him here. While there are certainly many options available, Sellsword covers both Melee and Ranged attacks with Frenzy, Weapon Master, Bullseye, and Counter Shot. Sellsword also gives the party a second Adventurer with Training for yet more additional actions. At rank 2 both Galen and Brahm can also bestow additional experience to our party.
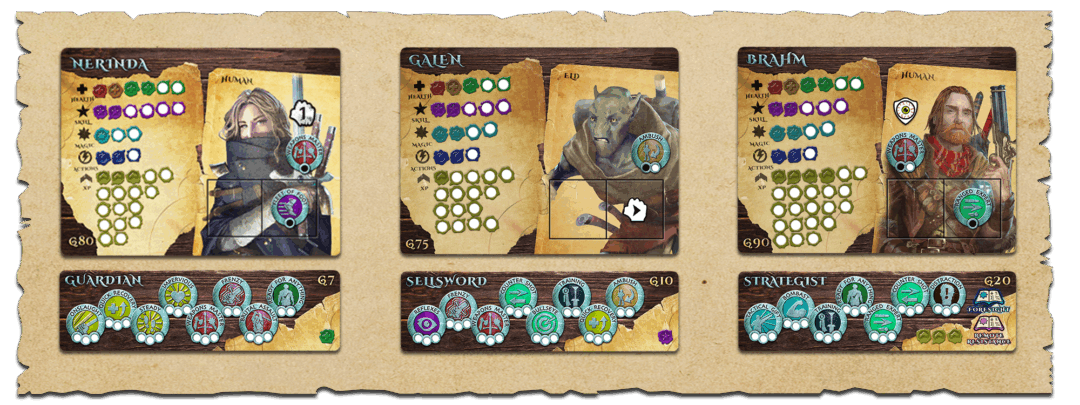
TOTAL PARTY COST: G282
Step 3 – Starting Build:
Starting Equipment:
With a stash of G68 left after building our party we have enough guilders to really tool up our Adventurers.
Since we can afford to start with some armour we should get some for Nerinda if she is going to be our tank. Bladed Bracers are a sound investment as well. One of the downsides to having one less Adventurer than normal is the smaller inventory space. Getting Nerinda to two dice for her unarmed attacks saves us some inventory space that would otherwise be taken up with a weapon. She will lose Fleet of Foot, but if we need her to move in a hurry, we can use Training from Brahm or Galen. A small shield rounds off Nerinda’s starting gear to help her take all the damage that is going to be heading her way.
Galen and Brahm will get both a melee weapon and a ranged weapon for combat utility.
Brahm gets a crossbow as it has slightly better dice than the short bow we are going to buy for Galen and Brahm can ready it as an effortless actin thanks to Ranged Expert. Alongside this we will give him a spear as it has Reach 1.
Galen gets a halberd as it also has Reach 1 which will let him use First Strike from more spaces, it also has Forceful Hits to help take down more dangerous enemies.
After buying ammunition we have G11 left which we can use to pick up three apples for some much-needed Health peg restoration. We could take some provisions, however with inventory space already being at a premium we’re going to have to go without for now.

Starting Experience:
Brahm:
Brahm’s has enough starting experience points to start every Strategist Skill at rank 1. Since he gets melee attacks as effortless actions with Weapon Master rank 2, one his experience should be spent on his Character board. We probably do not need Bombast in our first Quest as we will not have any Renown to use with it so we can leave this for now.
Galen:
Galen only has a single starting experience point and three Skill pegs. He needs to take something that will be useful multiple times during the first few Quests. Training is our best option as Galen will be making a lot of attacks, so passing out free attacks to the other Adventurers will make combat a lot easier.
Character 3:
Nerinda:
Ready for Anything for the extra action is an easy first choice. Quick Recovery to restore Health as needed and Impervious to avoid Poison from Lamentors would be the best starting Skills.
Party Progression:
Nerinda should pick up Impervious and Steady before she reaches rank 2 as these are her key tanking skills so getting those started early will mean she can be an effective tank as soon as possible.
Galen will want to add a rank of Ambush as soon as he is able to start utilising the synergy with First Strike. After that he will want Frenzy and Weapon Master to add more power to his melee attacks. Quick Recovery to restore Health pegs will be useful as we do not have a dedicated healer and picking up Training rank 2 as soon as it is available will help the party to rank up.
Brahm will only be able to spend one of the two experience he gets for completing rank 1 as he starts with so many Skills at rank 1 and it goes into the only space available, Bombast. As soon as Brahm reaches rank 2 he will want to pick up Tactical Gift and Training before anything else.
Conclusion:
No healer, fewer options and an action heavy damage dealing party of door kickers. What they lack for in subtlety and options they make up for in brute force and ignorance. With only three Adventurers, every action counts so it is a good thing they come with plenty of options to get more. This is certainly not the most forgiving way to venture into the dungeons of Enveron, but it will be a fast paced, seat of your pants, thrill ride.


Quentin G.
September 29, 2025 at 3:17 pm
In addition to all these great tips, you can combine Ready for Anything 2 with Quick Recovery 3 to get an extra action per turn. The Guardian and the Ranger are the only two classes to have native access to those two skills at the right level – so if you’re feeling cheesy you could make Galen a Guardian too, which would also increase the overall tankiness of the party (albeit at the cost of slower party progression).
In our experience, a leveled up Guardian Galen can easily whizz around the board and clear out entire rooms by himself. We had a few hilarious quest where he would run off on his own to complete the objective while the Maladaar read books and the Barbarian headed for the wine cellar.